Zoom is a wonderful camera feature that can give different perspetives to the final image. But most people don't know the difference betweeen optical and digital zoom. The difference is actually important and affects how your final image will look. Every camera has sensors beheind the lens that records light and colors coming into the camera. When you use an optical zoom, the lens actually magnifies the image that will be recorded on the sensor. If the lens works okay, this will not be a problem because if the camera has 5 megapixels, the enlarged or shrunk image will be recorded with all of the 5 megapixels. When the digital zoom is used, the pixels that are already recorded in the sensors are enlarged. Lets say you frame the orignal image. Then you zoom in closer by 50%. What the digital zoom does is crop half the image and will only use half the pixels. The pixel that are cropped out of the frame will not be used. So the digital zoom will increase the size of the image, but will only use half the pixels. The result is a less detailed picture. To sum things up, it is better to use the optical zoom because you will not lose the details of the image when it it zoomed in or enlared.
I hope this helps. Feel free to leave a comment if you like. Click here For more info on digital photography
Or click here for wedding photography
Thursday, April 15, 2010
Tuesday, April 13, 2010
Fast Moving Subject? Try Panning
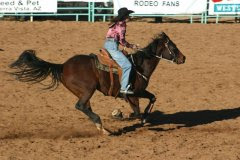
At some time or other, we all will try to photograph something that is just not standing still. If you take a shot of something moving really fast, there is a possibility that your image will come out blurred. The reason this happens is that the camera shutter speed is not set fast enough to "freeze" the subject. Its not a problem if you are photgraphing a small child running because they usually don't move fast enough to cause blurring while the shutter is open. However, if you are photographing something like a car race or fast sporting event, you need to use a very fast shutter speed to "freeze" the action. (see example 1)
Sometimes subject blur in the image is acceptable. It will actually convey the sense of speed. Thats ok if you don't need a sharp image of the subject. (see example 2) Notice the background is sharp although the subject is blurred.
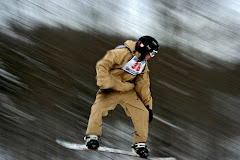
But there is another way to convey the sense of speed and get a relatively sharp subject image. It is called panning. It is a tried and true method that has been around for years. Here is what you do to pan. Frame the subject in your view finder as it is moving. The direction can be either left to right or right to left. (even up and down). Angle your body towards the subject and move the camera along with your body in the same direction that the subject is moving. Snap the picture while you and the subject are still moving. (shutter speeds of 1/60 to 1/125 are good for this method). The result will be a subject that is pretty much in focus and a background that is blurred due to the cmaera movement. This really emphasizes movement in the image. (See example 3)
It will take a little practice to pan in the beginning, but once you get it, you will have another tool in you photo skills arsenal.
Click here for more info on Taking Great Pictures or click any other link on this page.
Feel free to leave comments or suggestions on this page.
Sometimes subject blur in the image is acceptable. It will actually convey the sense of speed. Thats ok if you don't need a sharp image of the subject. (see example 2) Notice the background is sharp although the subject is blurred.
But there is another way to convey the sense of speed and get a relatively sharp subject image. It is called panning. It is a tried and true method that has been around for years. Here is what you do to pan. Frame the subject in your view finder as it is moving. The direction can be either left to right or right to left. (even up and down). Angle your body towards the subject and move the camera along with your body in the same direction that the subject is moving. Snap the picture while you and the subject are still moving. (shutter speeds of 1/60 to 1/125 are good for this method). The result will be a subject that is pretty much in focus and a background that is blurred due to the cmaera movement. This really emphasizes movement in the image. (See example 3)
It will take a little practice to pan in the beginning, but once you get it, you will have another tool in you photo skills arsenal.
Click here for more info on Taking Great Pictures or click any other link on this page.
Feel free to leave comments or suggestions on this page.
Labels:
action,
movement,
panning,
photography,
speed
Wednesday, April 7, 2010
What is the Macro setting all about?
We have all seen photos of flowers that are stunning and show great detail. Perhaps you tried to do the same thing with your camera and couldn't get the shot because the camera wouldn't focus when you got close to the subject. That is because the camera lens focusing ability might start at maybe only 1.5 feet. (so you can't focus on objects only 8 inches away.
The Macro setting on a camera lens provides the ability to photograph a small object at a very close up range and still get a picture that shows great detail. The original meaning of macro meant that you could photograph a small object and produce an image the same size of the object. That would be called a 1:1 ratio. However, the standards have been relaxed and lenses that produce 1:2 ratio (images one half the size of the original object) are being called macro lenses.
Most camera today including point and shoot types have a macro setting. The macro setting will usually be indicated by an icon picture of a flower. That is because its probably the most common use for the macro setting. However, you can use it for any extreme close up you desire. Besides flowers, try eyes, or an insect, or any small object that you are interested in photographing.
Shooting in the macro mode will create more opportunities for you to take great images.
For more info, try http://goodpics.info/
http://awesomepics.info/
Monday, March 22, 2010
Pixels and Resolution
Just about everyone uses digital cameras these days. One of the main things that determines your final image quality are pixels.
Pixels are individual elements that store the information received by the camera each time you press the shutter. Pixels carry information that determines the color, the strength of the color and how light is displayed. There can be millions of pixels in an image. However, they are not visible individually to the human eye. Instead we see them all together in continuos tones. Or we see them as a picture. The number of pixels determine the image resolution, or how much detail we see in the picture. The more pixels in an image, the higher the resolution.
Image resolution is measured in ppi. (pixels per inch) 300 ppi is the standard resolution for cameras. For computer monitors, the standard resolution is 72ppi for Windows and 96ppi for Mac.
The most important reason to know a little about resolution is that it determines the quality of your image. It also determines how much your picture can be enlarged without losing too much quality. Here are some examples if you are shooting with 300ppi.
A 3 megapixel camera will give a good 5X7 or smaller print
A 6 megepixel camera will give a good 9 1/2X 7 or smaller print
A 10 megapixel camera will give a good 13X8 or smaller print
These are approximate values. Keep them in mind when determining how much you will enlarge your prints. Also think about how large you will usually enlarge your prints before purchasing a camera.
For more info try:
http://awesompics.info/
http://goodpics.info/
http://urwedding.info/
Friday, March 19, 2010
Photography Basics-Learn the Rule of Thirds
Many times when someone prepares to take a picture, they will point the camera at the subject and then center the subject to the best of their ability. That is ok since they obviously will get the subject in the frame and probably won’t cut off much if any of the subject. As I mentioned, that’s ok, but let’s learn a different technique.
A popular tool that has been used by artists and photographers for years is the Rule of Thirds.
A popular tool that has been used by artists and photographers for years is the Rule of Thirds.
Lets get started with it. When looking through the viewfinder, picture a nine part grid in your mind. (if there is not a grid already built into your view finder.) Build the grid by imagining two horizontal lines across the viewfinder dividing it into thirds. Then do the same with two vertical lines. You now have a grid with nine different sections. The areas where the vertical and horizontal lines intersect are called the points of interest.
Ok, now here is how the Rule of Thirds works. When composing your picture, try to place your primary elements at, or around one or more of the points of interest. In essence what this does is to direct the eye away from the dead center of the picture and give the image more balance. This can make for a more interesting picture. In the case of a horizon or tree lines that flow from one side of the image to the other, this works well if you place the horizon or tree line near one of the horizontal grid lines rather than right in the middle of the frame. It works just as well with your vertical lines in the image. Keep in mind that the subject doesn’t have to be directly on a point of interest or exactly on a vertical or horizontal grid line. (just somewhere in the ares) This is where you use your judgment and decide what you like best. It’s a little trickier when shooting close up portraits. Instead of trying to use the points of interest for a face, try lining the eyes along the horizontal grid line.
Learn this technique and try it few times to see if you notice a more balanced and powerful final image. This rule should help, but don’t be afraid to break it if you feel more comfortable doing your own thing.
Click for more info:
http://www.goodpics.info/
http://www.awesomepics.info/
Monday, March 15, 2010
What Type Camera Should You Use?
OK...lets start with basics. What will you be using your camera for? Will you be taking pictures of the kids birthday party? or the family day at the beach? or maybe you will be taking pictures of the family visit to Grandma and Grandpa's house. If these images are only going to be used to show family and friends some of your everday events, then you probably only need a Point and Shoot camera. It is the most common consumer camera these days. The prices are pretty affordable for the average consumer. They are very compact (usually can fit right in your pocket) and are very convenient. All you have to do is turn them on and start taking pictures. The images are recorded in the JPEG mode which compresses the files and allows you to store a huge amount of images in your camera. The automatic settings will take very good pictures without you having to focus or make adjustments for shutter speeds, lighting and other things that go into taking a picture. At most, you might change the automatic setting for landscapes or extreme close ups. The landscape setting will give you a wider field to use, and the macro setting will help you get better detail in close up shots such as a flower. So if you just want to whip out the camera out and fire away, a point and shoot camera will take care of just about all your needs.
On the other hand if you are going to be more serious about your images and possibly want creative control on how your images are made, then you probably will need a Single Lens Reflex camera. They are not as small as Point and Shoot cameras and can cost quite a bit more. They have the same type automatic settings as the point and shoot camera, but those settings can be turned off to allow you to do things like control the amount of light intake and the shutter speeds. Also, a Single Lens Reflex camera allows you to change lenses according to what you want to do. For instance, you can take off the standard lens and replace it with a telephoto or wide angle lens. Although point and shoot cameras usually have a zoom button, their range is no comparison to the interchangeable lenses. Another difference is that Single Lens Reflex cameras can shoot in the JPEG mode same as point and shoots, but they also use the RAW mode which dosen't automatically compress the images. The RAW mode will give you much higher quality images which is great if you are going to enlarge an image past the regular photo store sizes.
The Single Lens Reflex camera is better for someone who is who wants to have more control over the image and who might want to use the images for more than the simple things people normally use a point and shoot camera for.
Here is a helpful site: www.goodpics.info
Saturday, March 13, 2010
This Blog Is About
We want to share info about taking better pictures with beginners to advanced photographers. (Maybe a pro might even find a tidbit here). There will be posts about all kinds of subjects from choosing a camera, to lighting, to framing and on and on. Hopefully you will pick up a few good tips along the way that may be helpful to you.
For More Info Click Here:
www.goodpics.info
For More Info Click Here:
www.goodpics.info
Subscribe to:
Posts (Atom)